
@nativescript/firebase-messaging
npm install @nativescript/firebase-messaging
What does it do?
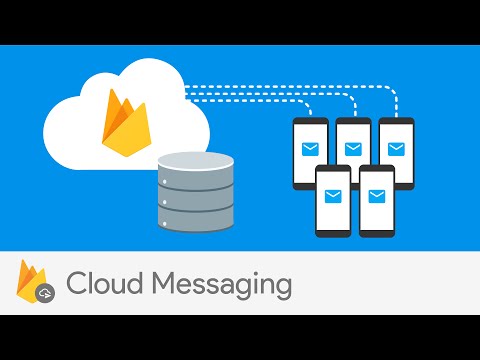
Firebase Cloud Messaging (FCM) is a cross-platform messaging solution that lets you reliably send messages at no cost.
Using FCM, you can notify a client app that new email or other data is available to sync. You can send notification messages to drive user re-engagement and retention. For use cases such as instant messaging, a message can transfer a payload of up to 4 KB to a client app.
Usage
iOS - Requesting permissions
iOS prevents messages containing notification (or 'alert') payloads from being displayed unless you have received explicit permission from the user.
This module provides a requestPermission method which triggers a native permission dialog requesting the user's permission:
import { firebase } from '@nativescript/firebase-core'
import '@nativescript/firebase-messaging' // only needs to be imported 1x

async function requestUserPermission() {
  const authStatus = await firebase()
    .messaging()
    .requestPermission({
      ios: {
        alert: true
      }
    })
  const enabled =
    authStatus === messaging.AuthorizationStatus.AUTHORIZED ||
    authStatus === messaging.AuthorizationStatus.PROVISIONAL

  if (enabled) {
    console.log('Authorization status:', authStatus)

    const didRegister = await firebase().messaging().registerDeviceForRemoteMessages()
  }
}
The permissions API for iOS provides much more fine-grain control over permissions and how they're handled within your application. To learn more, view the advanced iOS Permissions documentation.
On Android, you do not need to request user permission. This method can still be called on Android devices; however, and will always resolve successfully.
Receiving messages
FCM messages can be sent to real Android/iOS devices and Android emulators (iOS simulators however do not handle cloud messages) via a number of methods (see below). A message is simply a payload of data which can be used however you see fit within your application.
Common use-cases for handling messages could be:
- Displaying a notification (see Notifications).
- Syncing message data silently on the device (e.g. via ApplicationSettings).
- Updating the application's UI.
Depending on the devices state, incoming messages are handled differently by the device and module. To understand these scenarios, it is first important to establish the various states a device can be in:
| State | Description |
|---|---|
| Foreground | When the application is open and in view. |
| Background | When the application is open, however in the background (minimised). This typically occurs when the user has pressed the "home" button on the device or has switched to another app via the app switcher. |
| Quit | When the device is locked or application is not active or running. The user can quit an app by "swiping it away" via the app switcher UI on the device. |
The user must have opened the app before messages can be received. If the user force quits the app from the device settings, it must be re-opened again before receiving messages.
Depending on the contents of the message, it's important to understand both how the device will handle the message (e.g. display a notification, or even ignore it) and also how the library sends events to your own listeners.
Message handlers
The device state and message contents determines which handler will be called:
| Foreground | Background |
|---|---|
| Notification | onMessage |
| Notification + Data | onMessage |
| Data | onMessage |
- In cases where the message is data-only and the device is in the background or quit, both Android & iOS treat the message as low priority and will ignore it (i.e. no event will be sent). You can however increase the priority by setting the priority to high (Android) and content-available to true (iOS) properties on the payload.
To learn more about how to send these options in your message payload, view the Firebase documentation for your FCM API implementation.
Notifications
The device state and message contents can also determine whether a Notification will be displayed:
| Foreground | Background | Quit | |
|---|---|---|---|
| Notification | Notification: ❌ | Notification: ✅ | Notification: ✅ |
| Notification + Data | Notification: ❌ | Notification: ✅ | Notification: ✅ |
| Data | Notification: ❌ | Notification: ❌ | Notification: ❌ |
Foreground state messages
To listen to messages in the foreground, call the onMessage method inside of your application code. Code executed via this handler is able to interact with your application (e.g. updating the state or UI).
For example, the Alert API could be used to display a new Alert each time a message is delivered'
import { alert } from '@nativescript/core'
import { firebase } from '@nativescript/firebase-core'

firebase()
  .messaging()
  .onMessage(async remoteMessage => {
    alert('A new FCM message arrived!', JSON.stringify(remoteMessage))
  })
Data-only messages
When an incoming message is "data-only" (contains no notification option), both Android & iOS regard it as low priority and will prevent the application from waking (ignoring the message). To allow data-only messages to trigger , you must set the "priority" to "high" on Android, and enable the content-available flag on iOS. For example, if using the Node.js firebase-admin package to send a message:
admin.messaging().sendToDevice(
  [], // device fcm tokens...
  {
    data: {
      owner: JSON.stringify(owner),
      user: JSON.stringify(user),
      picture: JSON.stringify(picture)
    }
  },
  {
    // Required for background/quit data-only messages on iOS
    contentAvailable: true,
    // Required for background/quit data-only messages on Android
    priority: 'high'
  }
)
For iOS specific "data-only" messages, the message must include the appropriate APNs headers as well as the content-available flag in order to trigger the handler. For example, if using the Node.js firebase-admin package to send a "data-only" message to an iOS device:
admin.messaging().send({
  data: {
    //some data
  },
  apns: {
    payload: {
      aps: {
        contentAvailable: true
      }
    },
    headers: {
      'apns-push-type': 'background',
      'apns-priority': '5',
      'apns-topic': '' // your app bundle identifier
    }
  }
  //must include token, topic, or condition
  //token: //device token
  //topic: //notification topic
  //condition: //notification condition
})
View the Sending Notification Requests to APNs documentation to learn more about APNs headers.
These options can be applied to all FCM messages. View the Server Integration documentation to learn more about other available SDKs.
Always show notifications when the application is in foreground
If you always want to display notifications while the application is in the foreground without sending additional parameters/data when sending the push notification, you need to set the showNotificationsWhenInForeground option to true:
import { firebase } from '@nativescript/firebase-core'
firebase().messaging().showNotificationsWhenInForeground = true
Topics
Topics are a mechanism which allow a device to subscribe and unsubscribe from named PubSub channels, all managed via FCM. Rather than sending a message to a specific device by FCM token, you can instead send a message to a topic and any devices subscribed to that topic will receive the message.
Topics allow you to simplify FCM server integration as you do not need to keep a store of device tokens. There are however some things to keep in mind about topics:
Messages sent to topics should not contain sensitive or private information. Do not create a topic for a specific user to subscribe to. Topic messaging supports unlimited subscriptions for each topic. One app instance can be subscribed to no more than 2000 topics. The frequency of new subscriptions is rate-limited per project. If you send too many subscription requests in a short period of time, FCM servers will respond with a 429 RESOURCE_EXHAUSTED ("quota exceeded") response. Retry with exponential backoff. A server integration can send a single message to multiple topics at once. This however is limited to 5 topics. To learn more about how to send messages to devices subscribed to topics, view the Send messages to topics documentation.
Subscribing to topics
To subscribe a device, call the subscribeToTopic method with the topic name (must not include "/"):
import { firebase } from '@nativescript/firebase-core'

firebase()
  .messaging()
  .subscribeToTopic('weather')
  .then(() => console.log('Subscribed to topic!'))
Unsubscribing to topics
To unsubscribe from a topic, call the unsubscribeFromTopic method with the topic name:
import { firebase } from '@nativescript/firebase-core'

firebase()
  .messaging()
  .unsubscribeFromTopic('weather')
  .then(() => console.log('Unsubscribed fom the topic!'))
Server Integration
The Cloud Messaging module provides the tools required to enable you to send custom messages directly from your own servers. For example, you could send an FCM message to a specific device when a new chat message is saved to your database and display a notification, or update local device storage, so the message is instantly available.
Firebase provides a number of SDKs in different languages such as Node.JS, Java, Python, C# and Go. It also supports sending messages over HTTP. These methods allow you to send messages directly to your user's devices via the FCM servers.
Device tokens
To send a message to a device, you must access its unique token. A token is automatically generated by the device and can be accessed using the Cloud Messaging module. The token should be saved inside your systems data-store and should be easily accessible when required.
The examples below use a Cloud Firestore database to store and manage the tokens, and Firebase Authentication to manage the users identity. You can however use any datastore or authentication method of your choice.
Note
If using iOS, ensure you have completed the setup & requested user permission before trying to receive messages!
Saving tokens
Once your application has started, you can call the getToken method on the Cloud Messaging module to get the unique device token (if using a different push notification provider, such as Amazon SNS, you will need to call getAPNSToken on iOS):
import { firebase } from '@nativescript/firebase-core';
import '@nativescript/firebase-messaging';
import { FieldValue } from '@nativescript/firebase-auth';
import '@nativescript/firebase-firestore';


async function saveTokenToDatabase(token) {
  // Assume user is already signed in
  const userId = firebase().auth().currentUser.uid;

  // Add the token to the users datastore
  await firebase().firestore()
    .collection('users')
    .doc(userId)
    .update({
      tokens: FieldValue.arrayUnion(token),
    });
}

// Get the device token
    firebase().messaging()
      .getToken()
      .then(token => {
        return saveTokenToDatabase(token);
      });

    // If using other push notification providers (ie Amazon SNS, etc)
    // you may need to get the APNs token instead for iOS:
    //  if (global.isIOS) {
    //      saveTokenToDatabase(firebase().messaging().getAPNSToken());
    // }


    // Listen to whether the token changes
    firebase().messaging().onToken(token => {
      saveTokenToDatabase(token);

}
The above code snippet has a single purpose; storing the device FCM token on a remote database.
Inside of the saveTokenToDatabase method, we store the token on a record specifically relating to the current user. You may also notice that the token is being added via the FieldValue.arrayUnion method. A user can have more than one token (for example using 2 devices) so it's important to ensure that we store all tokens in the database.
Using tokens
With the tokens stored in a secure datastore, we now have the ability to send messages via FCM to those devices.
Note
The following example uses the Node.JS firebase-admin package to send messages to our devices, however any SDK (listed above) can be used.
Go ahead and setup the firebase-tools library on your server environment. Once setup, our script needs to perform two actions:
Fetch the tokens required to send the message. Send a data payload to the devices that the tokens are registered to. Imagine our application being similar to Instagram. Users are able to upload pictures, and other users can "like" those pictures. Each time a post is liked, we want to send a message to the user that uploaded the picture. The code below simulates a function which is called with all of the information required when a picture is liked:
// Node.js
var admin = require('firebase-admin')

// ownerId - who owns the picture someone liked
// userId - id of the user who liked the picture
// picture - metadata about the picture

async function onUserPictureLiked(ownerId, userId, picture) {
  // Get the owners details
  const owner = admin.firestore().collection('users').doc(ownerId).get()

  // Get the users details
  const user = admin.firestore().collection('users').doc(userId).get()

  await admin.messaging().sendToDevice(
    owner.tokens, // ['token_1', 'token_2', ...]
    {
      data: {
        owner: JSON.stringify(owner),
        user: JSON.stringify(user),
        picture: JSON.stringify(picture)
      }
    },
    {
      // Required for background/quit data-only messages on iOS
      contentAvailable: true,
      // Required for background/quit data-only messages on Android
      priority: 'high'
    }
  )
}
Signing out users
Firebase Cloud Messaging tokens are associated with the instance of the installed app. By default, only token expiration or uninstalling/reinstalling the app will generate a fresh token.
This means that by default, if your app has users and you allow them to log out and log in on the same app on the same device, the same FCM token will be used for both users. Usually this is not what you want, so you must take care to cycle the FCM token at the same time you handle user logout/login.
How and when you invalidate a token and generate a new one will be specific to your project, but a common pattern is to delete the FCM token during logout and update your back end to remove it, then to fetch the FCM token during login and update your back end systems to associate the new token with the logged in user.
Note that when a token is deleted by calling the deleteToken method, it is immediately and permanently invalid.
Send messages to topics
When devices subscribe to topics, you can send messages without specifying/storing any device tokens.
Using the firebase-admin Admin SDK as an example, we can send a message to devices subscribed to a topic:
const admin = require('firebase-admin')

const message = {
  data: {
    type: 'warning',
    content: 'A new weather warning has been created!'
  },
  topic: 'weather'
}

admin
  .messaging()
  .send(message)
  .then(response => {
    console.log('Successfully sent message:', response)
  })
  .catch(error => {
    console.log('Error sending message:', error)
  })
Conditional topics
To send a message to a combination of topics, specify a condition, which is a boolean expression that specifies the target topics. For example, the following condition will send messages to devices that are subscribed to weather and either news or traffic:
condition: "'weather' in topics && ('news' in topics || 'traffic' in topics)"
To send a message to this condition, replace the topic key with condition:
const admin = require('firebase-admin')

const message = {
  data: {
    content: 'New updates are available!'
  },
  condition: "'weather' in topics && ('news' in topics || 'traffic' in topics)"
}

admin
  .messaging()
  .send(message)
  .then(response => {
    console.log('Successfully sent message:', response)
  })
  .catch(error => {
    console.log('Error sending message:', error)
  })
Send messages with image
Both the Notifications composer and the FCM API support image links in the message payload.
iOS
To successfully send an image using the Admin SDK it's important that the ApnsConfig options are set:
const payload = {
  notification: {
    body: 'This is an FCM notification that displays an image!',
    title: 'FCM Notification'
  },
  apns: {
    payload: {
      aps: {
        'mutable-content': 1 // 1 or true
      }
    },
    fcm_options: {
      image: 'image-url'
    }
  }
}
Note
Check out the official Firebase documentation to see the list of available configuration for iOS.
Android
Similarly to iOS, some configurations specific to Android are needed:
const payload = {
  notification: {
    body: 'This is an FCM notification that displays an image!',
    title: 'FCM Notification'
  },
  android: {
    notification: {
      image: 'image-url'
    }
  }
}
Note
If you want to know more about sending an image on Android have a look at the documentation.
Pulling it all together
It's possible to send one notification that will be delivered to both platforms using the Admin SDK:
const admin = require('firebase-admin')

// Create a list containing up to 500 registration tokens.
// These registration tokens come from the client FCM SDKs.
const registrationTokens = ['YOUR_REGISTRATION_TOKEN_1', 'YOUR_REGISTRATION_TOKEN_2']

const message = {
  tokens: registrationTokens,
  notification: {
    body: 'This is an FCM notification that displays an image!',
    title: 'FCM Notification'
  },
  apns: {
    payload: {
      aps: {
        'mutable-content': 1
      }
    },
    fcm_options: {
      image: 'image-url'
    }
  },
  android: {
    notification: {
      image: 'image-url'
    }
  }
}

admin
  .messaging()
  .send(message)
  .then(response => {
    console.log('Successfully sent message:', response)
  })
  .catch(error => {
    console.log('Error sending message:', error)
  })
Android Integration
Push notification icon and color
If you want to use a specific icon for the push notification, it has to be configured in the tag in the AndroidManifest.xml
<meta-data android:name="com.google.firebase.messaging.default_notification_icon"
  android:resource="@drawable/your_drawable_name" />
<meta-data android:name="com.google.firebase.messaging.default_notification_color"
  android:resource="@color/ns_primary" />
Apple Integration
Enable push support in Xcode
Open /platforms/ios/yourproject.xcworkspace (!) and go to your project's target and head over to "Capabilities" to switch this on (if it isn't already): 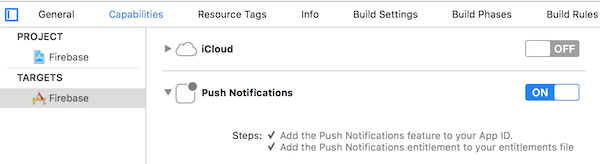
Note
Without this enabled you will receive push messages in the foreground, but NOT in the background / when the app is killed.
Copy the entitlements file
The previous step created a the fileplatforms/ios/YourAppName/(Resources/)YourAppName.entitlements. Copy that file to app/App_Resources/iOS/ (if it doesn't exist yet, otherwise merge its contents), so it's not removed when you remove and re-add the iOS platform. The relevant content for background push in that file is:
	<key>aps-environment</key>
	<string>development</string>
Allow processing when a background push is received
Open app/App_Resources/iOS/Info.plist and add this to the bottom:
<key>UIBackgroundModes</key>
<array>
  <string>remote-notification</string>
</array>
Provisioning
Follow this guide to the letter. Once you've done it run tns run ios and upon starting the app it should prompt you for notification support. That also works on the simulator, but actually receiving (background) notifications is only possible on a real device.
License
Apache License Version 2.0